

Learn how to take better photos with these 3 easy techniques
Have you ever wondered why one photo is better than another? While some photographs come out lacklustre, others create a real wow factor. Everyone can learn the secrets of how to take a good photograph; itâs not just something that should be just left to the artists among us…

Youâre off on your holidays full of excitement and expectation of all the exotic scenes and sights that await you. Touch-down and the aeroplane comes to its final stop. As you step outside and onto the tarmac, the air is hot and humid and after all the formalities and transfers, you finally arrive at your hotel just in time for a well-deserved glass of wine and the sunset filling the sky with beautiful tones of reds, oranges and yellows that melt all the troubles and stresses of work away with just one view. You rush back to your room to grab your new camera. You take off the lens cap and point it to the horizon. Looks great in the viewfinder – and click – the photo is taken. And what about one with your loved ones in the foreground. As the sun sinks slowly away, the darkness grows and you go to relive the moment over supper, showing off your masterpiece to everyone on the screen. The only thing is⦠itâs not quite as you saw it just moments ago. All the fantastic hues of orange, red and yellow are now just a mirky blur of light, with the fiery glowing sun nothing more than a large blob of white. And whatâs more – the photo with your family is even worse – all you can see is a black silhouette of where their heads should be – no smiles – no excited expressions of a first day on holiday – just solid black shadows. What a disappointment⦠and how incredibly frustrating.
Does this sound familiar? Youâre not alone. Thousands of people are upgrading their trusty point-and-shoots every day, just to question whether the expense was indeed worth it. Luckily, with a few insider secrets and a sprinkling of good advice, the story doesnât have to end this wayâ¦
1 – The Subject and the focal point
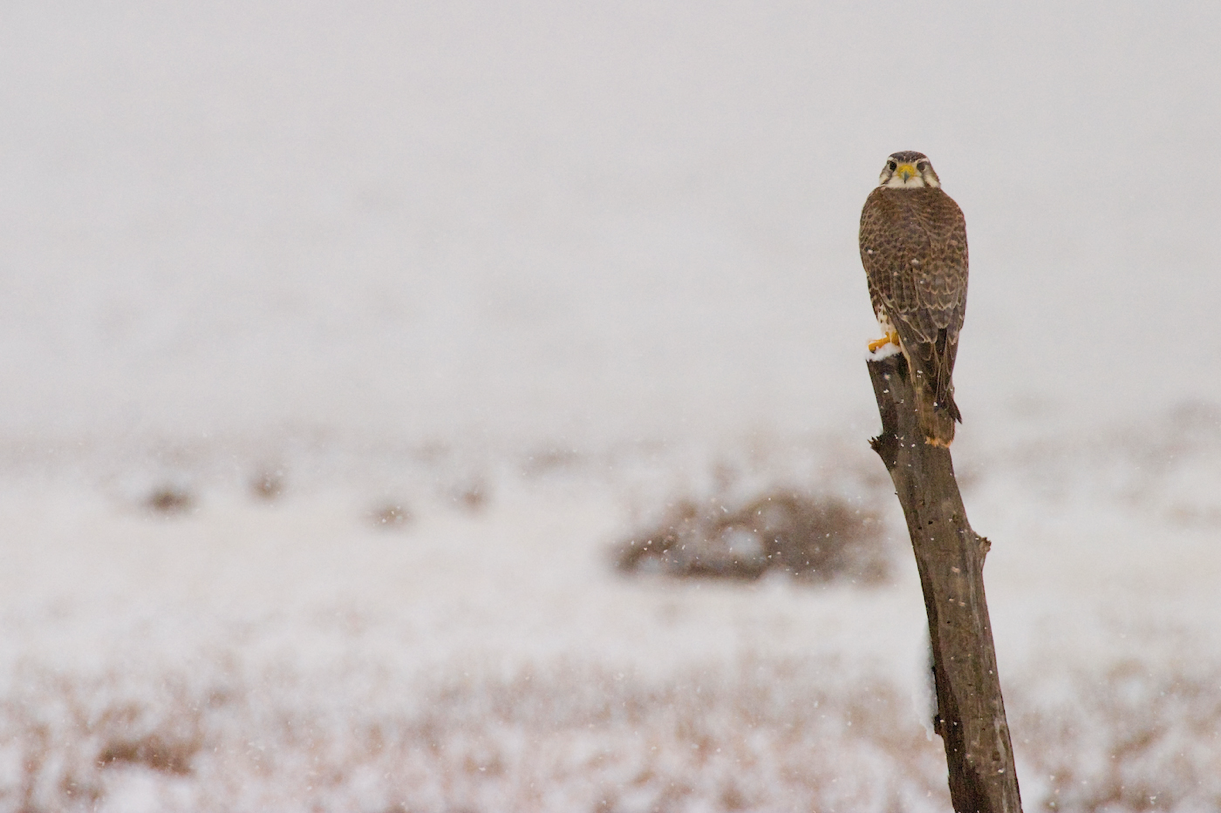
Iâm sure we are all aware that a photo should have a subject – after all – thatâs why youâre taking the photo in the first place. This is the story that you were trying to tell. Is like the subject of the book; itâs what itâs all about. Thatâs the easy part. In the example above, we know that the subject of the first photo was the sunrise itself – the magical moment when the day it at a wonderful beginning. However, most people tend to overlook the importance of firstly identifying a focal point, and secondly, how it is treated within the photograph. You can look at the focal point as being the part of the photograph to which your eye always tends to go back to. In this case its the large trees in the centre. It also acts as a resting point for the eye because with a clear focal point that your eye has a definite thing to look at and focus on. In the second example below, the focal point would be the head of the Bird of Prey as this is a critical part of the image. The backdrop of the snowy landscape is just adding context to the overall subject of the bird in its harsh and cold environment. The most natural position is slap bang in the centre of the frame. However, in most circumstances, this is the last place you should consider positioning such an important part of the image. Try putting the focal point to one side. This will give the viewers eye something interesting to look at, but also explore the backdrop, returning back to the most important part of the image when it’s done. As with all the rules of composition in photography, there are always exceptions. Thatâs why I look at these rules more as guidelines that you can choose to use whenever you feel appropriate.
2 – Always trying to tell the story or evoke an emotion
As we saw earlier, every photograph requires a subject and this is best understood as the story that youâre trying to tell or the emotion that you are trying to put across. When learning photography, as you start to understand the rules composition, appreciate the importance of correct exposure and learn the dos and donâts of what lenses to use, what buttons to press and what accessories to pack. Youâll soon start to appreciate that all of these things are there to help you to tell that story or to create that emotion in a more effective way. The tricky part is trying to identify the story or the emotion that you can tell. But once youâve given it a shot youâll find that it gets easier and easier and you will look for ways to enhance the emotions or tell the story in a more interesting and thoughtful manner.

3 – Always be learning from other peoples’ photographs
I often tell people that come in for lessons that it is quite possible for me to critique any photographs that they bring in, and tell them how to improve them. However, the person who is benefiting the most from this process is actually myself as opposed to the student. What I tend to find is that most students are already so emotionally attached to their photographs that they listen to the advice, but always take it with a pinch of salt as they had already put so much effort and energy into producing their mini-masterpiece. I, on the other hand, have been able to enter into their photograph and put myself in their position when they took the photograph. This allows me to mentally recreate the image and imagine doing whatever it takes to create a better version of the photographs. So turn the tables around – and start doing the judging yourself. You don’t have to be an expert to start; in fact quite the opposite.
If you can get into the habit of looking at other peopleâs photographs in magazines, online or on photo-sharing websites, you will really start to think through the process of what you would do to improve the photos you see and how YOU would take the photo yourself. How could you improve it? How could you bring even more emotion into it? If done often enough, the process will start to become so natural that when you are actually taking photos yourself and are faced with a scene, you will be in a much better position to make the most of it.
Learning how to take a good photograph can be seen as being an investment that is even more important than the cost of the camera itself. Getting the most out of your camera, whether it be a simple point-and-shoot, or a complicated digital SLR takes away the frustration that can lead to so much disappointment in photography. I hope that with these small tricks, you will no longer find yourself in a position of trying to take a sunset on your first day on holiday and regretting spending so much money on an all-whistles-and-bells camera that you just put on Auto and use as an expensive point and shoot.

Halid K Izzet
Owner & Photographer
Rhubarb & Custard Photograph, Eton